
Underscore, The Most Advanced Menu Widget In Blogger

Today's topic is about How to add Underscore Dropdown menu widget in blogger, its very different than any other menu widget because you don't need any advance knowledge in HTML or any other code just install this plugin and enjoy editing your menu directly from the layout of your blogger dashboard . Lets move further and see How to add Underscore Dropdown menu widget in blogger
Why Menu Widget Is Important?
Well menu is the most essential part of a blog, it helps you to provide valuable links to your visitors, so that they can access your blog more easily it also helps to reduce bounce rate and keeps your visitor stay for a long time.
What Is Special In Our Widget ?
The menu it self is very special you can't find any other tutorial or post which share such advance widget, this widget makes your link editing more easy and you don't have to edit those heck load of codes.
Let's Start Step-1 ( Adding CSS )
Before Editing we recommend you to make a backup of your template, so that anything goes wrong you still have your blog design safe.
The First thing you need to do is to login into your Blogger account and go to >> Templates >> Edit HTML and search for the ending ]]></b:skin> tag and just above it paste the following code.
/* ######## Navigation Menu Css by sorabloggingtips.com ######################### */
.navi-menu {
text-align: center;
margin: 0 auto;
padding: 0;
width: 100%;
}
.nav-menu {
margin: 0 auto;
background: $primarycolor;
}
.selectnav {
display:none;
}
.nav-menu {
padding: 0;
}
.nav-menu ul {
list-style: none;
margin: 0;
padding: 0;
z-index: 999;
}
.nav-menu ul li {
display: inline-block;
line-height: 1;
list-style: none outside none;
padding: 0;
text-align: left;
}
.nav-menu li a {
background: transparent;
color: #fff;
display: block;
font-size: 14px;
padding: 14px 19px;
position: relative;
text-decoration: none;
text-transform: uppercase;
font-family: Montserrat;
font-weight: 700;
font-style: normal;
letter-spacing: 1px;
}
.nav-menu li a i {
margin-right: 3px;
}
.nav-menu li a:hover, .nav-menu li a:hover .nav-menu ul li.hasSub a:after {
background:#fff;
color:#000;
}
.nav-menu ul li li a:hover {
padding-left: 20px;
}
.nav-menu ul li ul {
width: 180px;
margin: 0px;
position: absolute;
visibility: hidden;
display: inline;
padding: 0px;
height: auto;
border-top-width:0;
background: #fff;
-webkit-box-shadow: 0 1px 0 1px rgba(0,0,0,.1);
box-shadow: 0 1px 0 1px rgba(0,0,0,.1);
}
.nav-menu ul li:hover ul {
visibility: visible;
}
.nav-menu li li a {
color: #000000;
font-size: 14px;
padding: 10px 15px;
position: relative;
text-align: left;
-webkit-transition: color .15s linear 0s,padding-left .15s linear 0s;
}
.nav-menu li li {
float: none !important;
display: block;
}
.nav-menu a#pull {
display: none;
}
.nav-menu ul li.hasSub a {
padding-right: 25px
}
.nav-menu ul li.hasSub a:after {
color: #fff;
position: absolute;
top: 15px;
right: 10px;
display: block;
content: "\f0d7";
font-family: FontAwesome;
font-weight: 400;
font-size: 15px;
text-rendering: auto;
-webkit-font-smoothing: antialiased;
-moz-osx-font-smoothing: grayscale
}
.nav-menu ul li.hasSub ul li a:after {
display: none!important
}
Step-2 ( Adding HTML )
It depends upon you that where you want to add the menu but normally blogger's prefer to add it below header.
In the template, search for the <div id="header-wrapper"> tag and just below it paste the following HTML Coding. In case, you are unable to find <div id="header-wrapper">, then you can paste it just above <div class="row" id="content-wrapper">.
In the template, search for the <div id="header-wrapper"> tag and just below it paste the following HTML Coding. In case, you are unable to find <div id="header-wrapper">, then you can paste it just above <div class="row" id="content-wrapper">.
<div class='navi-menu'>
<b:section class='nav-menu row' id='Navigation Menu' maxwidgets='2' name='Navigation Menu' showaddelement='no'>
<b:widget id='LinkList100' locked='true' title='' type='LinkList' version='1' visible='true'>
<b:includable id='main'>
<div class='widget-content'>
<ul id='nav' itemscope='' itemtype='http://schema.org/SiteNavigationElement'>
<b:loop values='data:links' var='link'>
<li itemprop='name'><a expr:href='data:link.target' itemprop='url'><data:link.name/></a></li>
</b:loop>
</ul>
<script type='text/javascript'>
//<![CDATA[
$("#LinkList100").each(function(){var e="<ul id='nav'><li><ul id='sub-menu'>";$("#LinkList100 li").each(function(){var t=$(this).text(),n=t.substr(0,1),r=t.substr(1);"_"==n?(n=$(this).find("a").attr("href"),e+='<li><a href="'+n+'">'+r+"</a></li>"):(n=$(this).find("a").attr("href"),e+='</ul></li><li><a href="'+n+'">'+t+"</a><ul id='sub-menu'>")});e+="</ul></li></ul>";$(this).html(e);$("#LinkList100 ul").each(function(){var e=$(this);if(e.html().replace(/\s| /g,"").length==0)e.remove()});$("#LinkList100 li").each(function(){var e=$(this);if(e.html().replace(/\s| /g,"").length==0)e.remove()})});
//]]>
</script>
</div>
</b:includable>
</b:widget>
</b:section>
</div>
<div style='clear: both;'/>
Now Save your template and open layout to add links.
Note :- the menu is works on jquery so you have to install jquery plugin if you haven't installed it yet..
Step-3 ( Adding Links and editing the menu ) - Most Important !!
Now this is the most essential part of the tutorial and you have to do it very carefully.Go to your blogger dashboard > Layout > click Edit link on Main Menu widget.
Normal Link : MenuItem Sub Link: _MenuItem
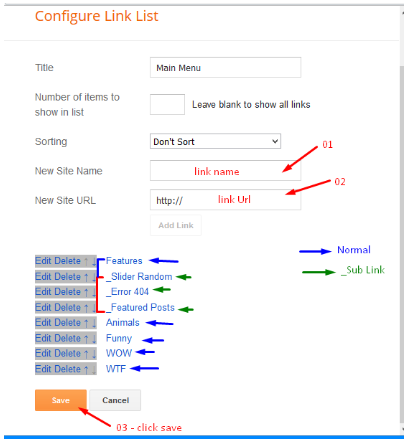
Note :- please take care of the Underscore you put at first, it targets the script to make the menu dropdown..
Conclusion
Congrats !! You have made it. now you have learned that How to add Underscore Dropdown menu widget in blogger. Visit your blog and check the awesome widget live in action, hope you liked this tutorial, if you enjoyed then please share it with your friends, we are working hard to develop more such awesome widgets please stay tuned with Us.


No comments