How to Add Google Analytics to Blogger
Google Analytics will provide you useful information about who is visiting your Blogger blog and how they're finding it. In order to install Google Analytics on Blogger, you will need a currently active Blogger blog. If your Blogger blog was created after 2006, you'll be able to use the first steps. If you have a blog started before 2006, and you haven't migrated from the Classic template, you'll need to follow the Adding Google Analytics to the Classic Template steps or convert your blog to the new template..[1] Google Analytics can take up to 24 hours before it starts working.
Method 1
Method 1
1.If you don't have a Google account, then create one. Go to google.com, click Sign In, and then click Create an Account.
2.Click here to go to the Google Analytics website.
3.Click Access Google Analytics. If you're not logged in to Google, click Sign In, and then enter your Google username and password.
4.Save your communication preferences. The first time you sign in to Google Analytics, you'll be prompted to change save your communication preferences. If you don't want Google Analytics to send you email, uncheck all the boxes, and then click Save Preferences.
5.Start using Google Analytics. Click Sign up to start using Google Analytics.
6.Create an account name. In the Account Name field, type a name for the Google Analytics account.
- The account name can be the name of your Blogger weblog, your Google username, or any descriptive word or words you'd like to use.
7.Add the name of your Blogger blog. In the Website Name field, type the name of your Blogger blog.
- It doesn't have to match exactly, but if you have several Blogger blogs, it helps if you write the correct Blogger name for each Google Analytics account.
8.Add the Blogger blog URL. In the Website URL field, type or copy and paste your Blogger blog URL.
- Be sure to include the http:// at the start of the URL.
Method 2
Adding the Google Analytics Tracking ID to the Blogger Blog
1.Get the Google Analytics tracking ID. Scroll down to the bottom of the page, and then click Get Tracking ID.
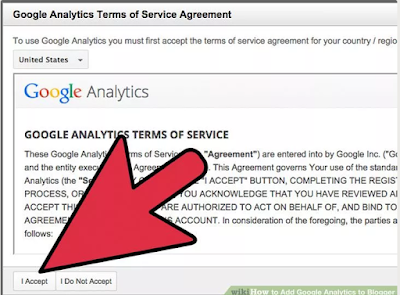
2.Read the Google Analytics Terms of Service Agreement, and then click I accept. If you click I do not accept, you won't be able to use Google Analytics.
3.Copy your Tracking ID. Find the alphanumeric code under Tracking ID, select it with your mouse, and then copy it.
- You can also write it down on a piece of paper.
4.Go to Blogger and login to your account.
- If you're already logged in to your Google account, you won't need to log in again.
5.In the left sidebar, click Settings. If you don't see a sidebar with Settings, then you're using the Classic Template.
- Click here for instructions on adding the Tracking ID to the Classic template.
- Click here for instructions on updating Classic to the new template.
6.In the Analytics Web Property field, paste or type your Google Analytics Tracking ID.
Methode 3.
Adding the Google Analytics Tracking ID to the Classic Blogger Template
1,Get the tracking code. On the Google Analytics administration screen, under This is your tracking code, select all the code in the box, and then copy it.
2.Go to the Template tab. At the top of the screen, click the Template tab to go to your blog's template code.[2]
3.Add the Google Analytics code to the template HTML code. In the template code box, scroll down until you find the </body> tag. Put the cursor on the line above the </body> tag, and then paste the Google Analytics code.
4.Save your changes. Click SAVE TEMPLATE CHANGES.
Method 4
Converting to the Newer Blogger Template
1.Click the Template tab.
2.Click Customize Design.
3.Click Upgrade Your Template.
4.Choose a new template to use, and then click Apply to Blog.
- If you want to go back to the Classic template, on the Template screen, scroll to the bottom of the page, and then click Revert to Classic Template. Click Upgrade Template.


No comments